Prize Coffee Cake


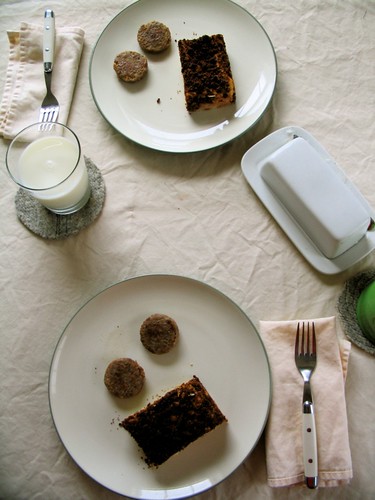
Coffee Cake Cooling

One of my goals in life is to win a blue ribbon at a county fair. Dead serious.

I have no experience with State Fairs aside from the Rogers and Hamerstein movie, so they don't particularly interest me. But as a kid I lived in the county seat - so I had to go to the fair a lot. I'm sure this isn't actually the case, but it seemed as though we had three or so major fairs at the Napa Valley Expo center a year and I was at pretty much every one.

First there were the educational fairs. There was the one my modeling clay mission was displayed at amoungst the hundreds of other missions of the pasta, cardboard, and/or lego varieties. There was the fair that they had the city-wide science fair at: my experiment on the water purifying abilities of the sun didn't even place. There was the year I volunteered to do an anti-drug puppet show at, only to find upon arrival that the "booth" contained no puppet stage and I spent several hours sitting under a table teaching kids to "Just Say No," while the woman at the next table urged people to vote no on proposition 9.

And then there was the Town and Country fair where the 4-H kids strutted their hogs and the quilts and jams were on proud display. There were games: a friend once won a guppie and then passed it off on a happy little girl and her less than happy parents; there was food: corn dogs and funnel galore! There were the rides that only one year I was allowed to ride, which included a fun house/maze that I raced though only to be incredibly disappointed when I came out the other side that I hadn't spent more time.

But missions and guppies aside, the real reason I went to fair after fair was to dance.

Anything Goes

Not at the Fair, but you get the idea. (That's me in the far right, front row)

From approximately 1988 to 2001 I was made to put on my tutu and blue eye shadow and dance with my classes in tap, jazz or ballet. The stage was unforgiving concrete and it was always devilishly hot. One year my teacher told us not to bother with wearing foundation, it'd just melt it off. I love dancing, but I hated dancing at the fair, it was uncomfortable and there was a good chance someone I did not want seeing me in a leotard would stroll by during my performance (and several have).

Spandex and sequin trauma aside, I always like the craft, food, and animal displays and I still hope to win a ribbon of my own some day.

Coffee Cake and Sausage

This particular recipe won a ribbon for my family once upon a time (though the recipe card always said "prize" so I have no idea which prize it won - but if anyone in the family wants to clarify that'd be great) and so after that long introduction, I give you:

Prize Coffee Cake:


  • ¾ cup sugar
  • ¼ cup butter or shortening
  • 1 egg
  • 1½ flour
  • 2 tsp baking powder
  • ½ tsp salt
  • ½ cup milk

Topping:

  • ½ cup brown sugar
  • 2 Tbl melted butter
  • 2 Tbl flour
  • 2 TBl cinnamon

Preheat oven to 375°F. Grease and flour a 9"x9" pan. 

Mix together sugar, butter, and egg to make butter cream. It may look good, but do not sample - it tastes terrible as a college roommate of mine discovered. Add milk and mix.

In a separate bowl, blend flour, baking powder and salt. Add dry mix to butter cream. Pour into pan.

Mix together topping ingredients. If necessary add a little more melted butter until it clumps, but we wary- too much butter will cause the topping to turn molten and sink into the batter instead of staying nice and crispy on top.  Sprinkle topping on top of the batter.

Bake 25-35 minutes or until a tester comes out clean. Recipe doubles well, just add 5-10 minutes cooking time for a 9"x18" pan. 

Breakfast Aftermath

Surprise sleepy folks with coffee cake, eat all the crumbs.

Print Friendly and PDF Follow
follow us in feedly

Sweater #3 - Learning Patience

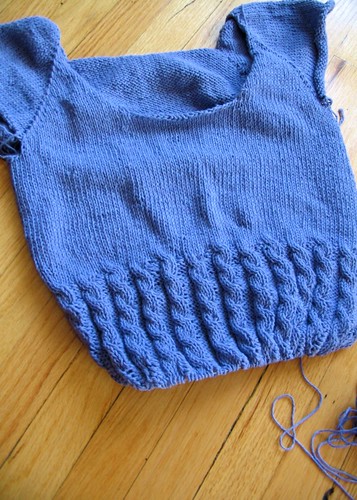
Dahlia Sweater

So I have a backlog of stuff to blog about, and now that MacB has closed, it seems more likely that it will appear on theses pages soon.

I finished this sweater about two weeks ago - the pattern is Dahlia from Knitty. The pattern was designed by a freshman in high school. This puts me to shame, so I decided to design my next sweater myself to show those uppity high schoolers. 

Dahlia Sweater


I partly chose this sweater because I though on size 8 needles, it would be a quick knit. Famous last words.

While I did finish the sweater in under 6 weeks, I had to restart this thing 5 times.

Why, you may ask - well first the raglan was an ill-explained Right Lifted Increase/Left Lifted increase. Which when I finally figured out with the help of my knitting circle (hint: when doing the left lifting increase - don't grab the stitch you just made) makes a very very pretty raglan increase line - so it was worth the trouble - but this was an exercise in patience. 

I also ignored the cries of "the thing's too big!" on Ravelry and cast on in my designated size, which by the time I hit the chest portion I realized was huge even though my gauge matched perfectly, so it got unwound for the 5th and final time.I also decided to move up the neckline an inch or so - because it was a tad low for me. After that point, though, the thing was a breeze and I enjoyed teaching myself to do the cables without a needle.


Dahlia Sweater

I totally have no patience when it comes to wearing stuff I make, so these photos are all of the unblocked (gasp!) sweater. And perhaps in punishment for my impatience - the blocked version looks about 20% better than it does in the above pictures. Another lesson learned. 

I'd like to say it's too warm to wear it now, it being after Memorial Day and all, but alas it is currently 49°F in Chicago. Le sigh...

Print Friendly and PDF Follow
follow us in feedly

Check One More off the List

Kasey

It was my friend Kasey's birthday this weekend, and in honor of that very special event, Kasey, her boyfriend David, Mr. Cleaver, and I all went down to Navy Pier.

As some of you may know, Mr. Cleaver and I are moving back to Maine this summer and our time in Chicago is quickly dwindling.

With this in mind, we've been constructing (a mostly mental) list of things we have to do before we leave Chicago. The list includes things like see a show at Steppenwolf (done - Dead Man's Cell Phone), visit the Shedd Aquarium (not done), see a Cubs games (done, but like to do again), eat Katie Cakes at Taste of Heaven (never too many times for this), and so on.

Ferris Wheel

One of the things that has been on my "Chicago-to-do List" ever since I moved to the city was to ride the Ferris Wheel that towers over Navy Pier. At 140 feet in diameter, and a seating capacity of 240, this baby is big - though not as big as the original Ferris Wheel that was built in Chicago for the World's Columbian Exposition in 1893 - which stood 264 feet and could carry 2,160 people. (Thank you Devil in the White City)

Well Saturday was finally my day to check that one off the list and was well worth it. The view are amazing:

Chicago Skyline from Ferris Wheel

Chair Swing

Bird's eye view of Mirco Golf

Now it must be said that Mr. Cleaver is not a fan of heights. So here's me waving at Mr. Cleaver.

Waving at John

And here's Mr. Cleaver waving back:

John on the Ground

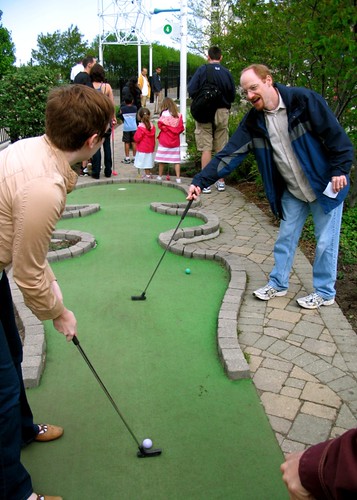
In addition to our jaunt on Mr. Ferris' wheel, our party of four ate a great lunch at Charlie's Ale House and played a rousing gold of Micro Golf.

Now I say micro and not mini because seriously, look at the size of each of these (18) holes.

Blockin' my shot

My favorite part of the game was making up random "pars" for each hole. I think five was the highest and the average was two or three. Let it be said though, that this is a speedy game, which throngs of small children on either side.

Not that you can't take time to make that perfect shot :)

In the Hunt

Print Friendly and PDF Follow
follow us in feedly

S'more Pie: Take One

Slice of S'More

So I'm going to bad here, and post something I baked today sans recipe. I'm doing this because the recipe isn't ready yet, but when it is, it'll be here.

I came up with the idea for the S'more pie sometime shortly after watching Waitress, a little film that is well worth renting, especially if you like pie. As often happens, life intervened and I never got around to making this pie until today.

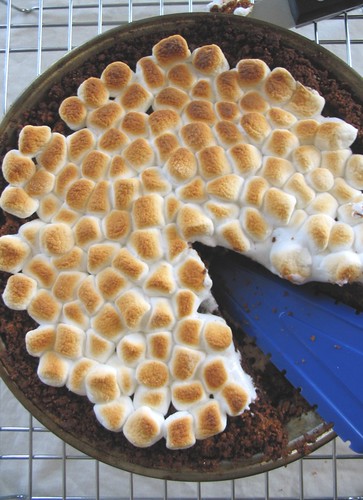
S'more Pie

The basic idea is this: graham cracker crust, flourless chocolate cake filling, topped with perfectly browned mini-marshmellow. A s'more in a pie!

Closeup of S'more Pie

This was a good start. There are some issues that need addressing, the crust isn't quite right and got a little too crispy, the filling wasn't chocolately enough for me and the marshmellow is a little overwhelming, but like I said, a good start.

I also tasted it just out of the oven to capture the meltiness of marshmellow, but I'm interested to see if the flavors meld more when cooled. It'll probably be a while before I get another shot at this one, but I'll let you all know when I do.

Slice of S'more

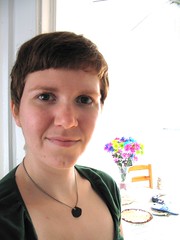
On a completely unrelated note: New Hair


I chopped off all my hair in preparation for summer weather.

(Sorry Mom).


Print Friendly and PDF Follow
follow us in feedly

The Slippery Stash Slope

For the first 2½ years of my knitting life, I managed to avoid accumulating a stash, even prided myself on it.

I only had yarn for my current project and you'd be hard-pressed to get me to select a yarn without a specific project mind (though it did occasionally happen - leading, for instance to the Honeymoon Mini-Cardi, but in full disclosure I probably made my brand-new husband nuts in my indecision to purchase that yarn while on our honeymoon). I even was obsessive about using up the leftovers of the yarn I had.

And then it happened.

I went into my local yarn shop to pick up some sock yarn and "lo-and-behold!" all the yarn in the bins on the floor was only a dollar. Even I couldn't resist that bargain and so I grabbed these five balls of silk.

Berroco Silk Stash

What am I going to make with it? Who knows! Though Ravelry has provided some intriguing options, namely this and this.

Not too long after I purchased the silk, I went back to the same store to buy some stitch markers for a sweater I'm knitting up and came out with these:

Sock Stash

Granted, this is for a specific project, but one I likely won't start for some time.

And then that same old yarn shop, in honor of Mother's Day and Government Rebate checks decided to have a 25% off of everything sale. So I got this sock yarn that I was ogling when I bought the last sock yarn.

Lorna's Sand Ridges Sock Stash

Now, I'm sure some hard-cord yarn collectors will scoff at my measly 9 skeins, but it's a slippery slope I say! A very slippery slope.

At least I'm using some of my yarn...

Dahlia in Progress

But I'm fairly certain I'm going to have a ball leftover.

I think I'll make it into a hippo. 

Print Friendly and PDF Follow
follow us in feedly

Busy Bee!

Busy Bee Apron

A few weeks ago somebody asked me if I really liked yellow. 

At the time I was a little confused, "Why do you ask?" I said.

"Every time I see you you're wearing yellow," she said.

At the time I passed it off as a good combo for the green I often consciously wear, but as I though about itI saw she was right  - yellow is creeping more and more into my wardrobe. Nor is it the first time. The first pair of shoes I ever really got excited about was a pair of bright yellow Adidas with blue stripes I had in high school  (the school colors at that!). 

Another case in point this apron:

Busy Bee Closeup

This apron's life started shortly after Christmas when a co-working, hearing I had made an apron for a Christmas gift, asked me to make her one before the summer was out. Being as this co-worker is the #1 best thing about my current job and I was given a long lead time, I happily agreed. Fast-forward several months later and I'm in my favorite fabric store where I discover this fabulous section I'd never looked in before: Ribbon. Spools upon spools of fantastic ribbon!

First, I spotted some lovely cherry ribbon, which I snagged a few yards of, then I saw this bee ribbon and it was all over for me. I practically had to run out of the store to prevent coming home with a car load of ribbon, it was all so wonderful. Of course I knew bees and cherries would make perfect adornments for that apron I had agreed to make and so I picked out the blue and yellow gingham you see above to complete the project. 

I will admit that when I started making this apron I fully intended to give it away, but being as this was my first designed-from-scratch piece, I made allotments for the seams, but not the hemming/edging, so my apron ended up being a little smaller than planned, so this one works as a lesson learned (and a little something pretty for my apron collection.)


Glamour Bee

The good news is that this apron only took me a weekend to complete (including finishing every seam so there are no raw edges - as inspired by Bitter Betty), so I should be able to make a new one fairly soon, though it'll likely be a variation on this one, just to keep things interesting. :)

Print Friendly and PDF Follow
follow us in feedly

My Poufy Shirt

IMG_3594.JPG

I don't know what it is about the week leading up to a big to-do that makes me want to sew so much, but it seems like whenever would be the least likely time to whip out the machine is exactly when I choose to do so. 


I'm going to admit. I'm not an everyday stitcher. I'm not even an every-week sewer, but book me a plane ticket out of the state and I'll set up the machine in the dining room.

I, of course, realize that some of this has to do with my need to show-off (seriously, I have a blog to document it all for goodness sake). Mothers and mothers-in-law are great audiences for showing-off my handmade stuff. 

For example, just before leaving for my bridal shower back last summer, I sat around hand-sewing the hem of a summer dress.  Just before I left for my wedding in October, I made this dress:

Lent Day 32

Just before I went to my mother-in-law's for Christmas I made this one:

Lent Day 31

This time around, I'm doing crazy-tons of theatre stuff and I make a shirt. I know you were expecting "dress," but I'm branching out. 

IMG_3589.JPG

So yes, I made a shirt. The last time I made a shirt, I was in high school and it was a very simple, very boxy men's bowling shirt and my dad got one of the folks at his work to stitch "Miss Leah" over the pocket. I still have it, and maybe after I add some much-needed darts to it, I'll post it here.

But after a 7 year or so break from shirts, I decided to dive back in again. You see, I have this *crazy* idea about slowly crafting an entire wardrobe - except t-shirts and underwear, because I'm not that crazy.

IMG_3580.JPG

Of course, about halfway through the shirt I realized that I didn't have a clue how to make buttonholes on this machine.

Let me say, I love the buttonholer on my machine. Love it! It made the whole process so easy I just want to run around putting buttonholes on everything. Forget cute as a button, how about cute as a buttonhole? And the more I type "buttonhole" in a row the less it sounds like I should be typing buttonhole. Also - did you know you can sew on a button with a machine? I'm so excited by this development in my life!

This was definitely A learning shirt, between the pin-tucks and lots of curved seams. But I'm super-proud of the hem and it was the best go I'm had with sleeves recently. So it's all to say I'm getting better - even if the collar on this shirt is a bit of a mess.

My other confession about this shirt? The contrast stitching was totally unintentional. I bought some dark blue thread for another project, which when I went to sew the shirt was the only blue thread I could find, so I assumed I got it for both projects. About halfway through the shirt I found the light blue thread. Ah well. As for that other project? I'm going to have to buy more thread, because this is ow much thread I had left at the end of this shirt:

IMG_3585.JPG


PS - for those who are curious. The pattern was McCall's M5322 version A without the trim.

Print Friendly and PDF Follow
follow us in feedly

Fair is Foul and Foul is Fair

Karisa Bruin, Megan Faye Schutt & Tien Doman (Witches) with Dana Wall (Macbeth) in Greasy Joan & Co.'s production of MACBETH.  Photo by Michael Brosilow.


Tonight, after months of work, Macbeth is opening!

I'm really proud of this production, so if you're in the Chicago area I'd encourage you to come down and see it.

Print Friendly and PDF Follow
follow us in feedly

Yellow + Blue = Green

With spring's arrival, I start yearning for new springier colors - namely bright yellows, blues and greens. This yearning is particularly pronounced on grey days like today, when I need pick-me-up. And so some colors that have been brightening my days recently.

Yellow Bracelet

My "Andi" bracelet from Luxcharm on etsy. I have a thing for bracelets right now. I never used to wear them (though until about a year ago when it broke I always wore a watch), but now I think they're great. This is the first in what may prove to become a bracelet collection.

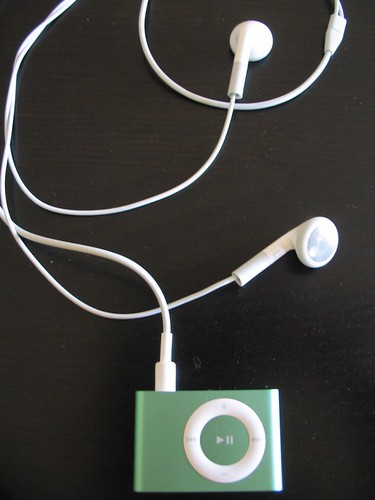
Green Ipod

My green ipod. Yep, we finally gave into the ipod revolution. They lowered the price, so Mr. Cleaver and I could no longer resist. Of course I have about 10 cds on my laptop, so the music isn't too varied right now, but it does make the 45 minutes on the train go a little faster.

Blue Siscors

My blue sewing scissors. When I bought my sewing machine last summer I also bought a sewing starter kit with scissors, needles, measuring tape, chalk paper, etc and all the appropriate accessories were blue. And so is the shirt I'm currently sewing, though it is more of sky than primary blue. The needle and thread were for slipstiching the inside collar. I hate slipstitching. Actually I have a terribly small amount of patience with any finishing really. Once all the major seams are in place I start wearing the thing. Seriously, I have two dresses that I've been wearing for months that need some finishing done. Ah well...


Daffodil Socks

I did, however, completely finish my Pomatomus socks, which hey - are yellow, blue and green! And considering the number of rows I had to rip back on these socks due to inattention, it's pretty amazing that I finished them as quickly as I did. Then again, knitting also makes that 45-minute commute home much faster.


Print Friendly and PDF Follow
follow us in feedly

Marryin' Mac 'n' Cheese

Mac 'n' Cheese

So good, if we weren't already married, my husband would marry me for it.

Like pretty much all of America, I grew up on the Kraft "Blue Box" Mac 'n' Cheese. My first taste of the homemade stuff was when my brother attempted to make some while I was in high school. I not sure what happened, but it was notthe best, shall we say. I retrospect, I think it needed salt. 

Years later, I came across this recipe in Real Simple Magazine and thought I'd give it ago, but I was a little put off by the called for 6 cups (!) of milk, and using the full quarter cup of oil on the bread make my crackers waaaay too greasy, so I did a few mild changes, as listed below.

And its really good. This is maybe one of Mr. Cleaver's favorite things I cook, and every so often (as with the Cherry Pie), he'll just "happen" to the buy the ingredients and if I just "happen" to want to make it, it would "happen" to be swell. I love it too, so it's not too hard to convince me.  

Mac 'n' Cheese Ingredients

Mac 'n' Cheese, adapted from Real Simple, Nov. 200. 

  • 1 pound elbow macaroni
  • 5 Tablespoons unsalted butter (plus some to grease dish)
  • ½ cup all-purpose flour
  • 3-4 cups whole or low-fat milk (I use 1% it turns out plenty rich and creamy)
  • 14 oz.-16oz.  cheese of choice (I like cheddar or you could do a mix.)
  • 2 teaspoons sea salt 

Herbed-Crumb Topping

  • 1 cup or about ½ a sleeve of your favorite butter crackers (Ritz, Keebler Club) smashed
  • 3 Tablespoons olive oil
  • oregano and thyme to taste
  • 1 teaspoon salt
  • ¼ teaspoon black pepper

Heat oven to 400°F and grease a 9x13 baking dish.

Cook the macaroni for slightly less time than the package says, so it's still a little firm. Drain and rinse.

While the mac is boiling, combine cracker crumbs, oil, herbs, salt and pepper. The oil should be just enough to coat and make the crumbs slightly stick together. 

In a saucepan, melt butter. While whisking constantly, add the flour and cook for about 3 minutes. The mixture will clump. Still stirring, add the milk and cook for another 7 minutes, the mixture will start to get thick.  Add the cheese and salt and stir until all the cheese is evenly melted.

Mix together the mac and the cheese, pour into the prepared dish and sprinkle with the crumbs.

Bake for about 25 minutes or until golden and delicious.

It'll sit like the brick of cheese and pasta it is in your stomach, but it'll be so worth it. 

Reheats really well in the oven too! 

Print Friendly and PDF Follow
follow us in feedly