S'more Pie: Take One

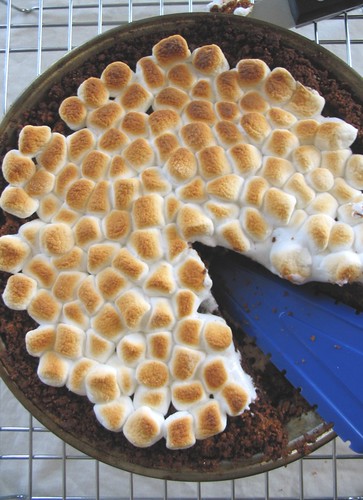
Slice of S'More

So I'm going to bad here, and post something I baked today sans recipe. I'm doing this because the recipe isn't ready yet, but when it is, it'll be here.

I came up with the idea for the S'more pie sometime shortly after watching Waitress, a little film that is well worth renting, especially if you like pie. As often happens, life intervened and I never got around to making this pie until today.

S'more Pie

The basic idea is this: graham cracker crust, flourless chocolate cake filling, topped with perfectly browned mini-marshmellow. A s'more in a pie!

Closeup of S'more Pie

This was a good start. There are some issues that need addressing, the crust isn't quite right and got a little too crispy, the filling wasn't chocolately enough for me and the marshmellow is a little overwhelming, but like I said, a good start.

I also tasted it just out of the oven to capture the meltiness of marshmellow, but I'm interested to see if the flavors meld more when cooled. It'll probably be a while before I get another shot at this one, but I'll let you all know when I do.

Slice of S'more

On a completely unrelated note: New Hair


I chopped off all my hair in preparation for summer weather.

(Sorry Mom).


Print Friendly and PDF Follow
follow us in feedly

The Slippery Stash Slope

For the first 2½ years of my knitting life, I managed to avoid accumulating a stash, even prided myself on it.

I only had yarn for my current project and you'd be hard-pressed to get me to select a yarn without a specific project mind (though it did occasionally happen - leading, for instance to the Honeymoon Mini-Cardi, but in full disclosure I probably made my brand-new husband nuts in my indecision to purchase that yarn while on our honeymoon). I even was obsessive about using up the leftovers of the yarn I had.

And then it happened.

I went into my local yarn shop to pick up some sock yarn and "lo-and-behold!" all the yarn in the bins on the floor was only a dollar. Even I couldn't resist that bargain and so I grabbed these five balls of silk.

Berroco Silk Stash

What am I going to make with it? Who knows! Though Ravelry has provided some intriguing options, namely this and this.

Not too long after I purchased the silk, I went back to the same store to buy some stitch markers for a sweater I'm knitting up and came out with these:

Sock Stash

Granted, this is for a specific project, but one I likely won't start for some time.

And then that same old yarn shop, in honor of Mother's Day and Government Rebate checks decided to have a 25% off of everything sale. So I got this sock yarn that I was ogling when I bought the last sock yarn.

Lorna's Sand Ridges Sock Stash

Now, I'm sure some hard-cord yarn collectors will scoff at my measly 9 skeins, but it's a slippery slope I say! A very slippery slope.

At least I'm using some of my yarn...

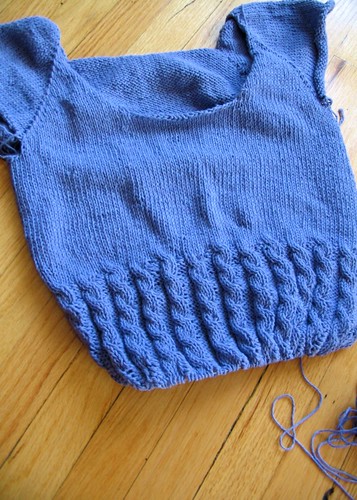
Dahlia in Progress

But I'm fairly certain I'm going to have a ball leftover.

I think I'll make it into a hippo. 

Print Friendly and PDF Follow
follow us in feedly

Busy Bee!

Busy Bee Apron

A few weeks ago somebody asked me if I really liked yellow. 

At the time I was a little confused, "Why do you ask?" I said.

"Every time I see you you're wearing yellow," she said.

At the time I passed it off as a good combo for the green I often consciously wear, but as I though about itI saw she was right  - yellow is creeping more and more into my wardrobe. Nor is it the first time. The first pair of shoes I ever really got excited about was a pair of bright yellow Adidas with blue stripes I had in high school  (the school colors at that!). 

Another case in point this apron:

Busy Bee Closeup

This apron's life started shortly after Christmas when a co-working, hearing I had made an apron for a Christmas gift, asked me to make her one before the summer was out. Being as this co-worker is the #1 best thing about my current job and I was given a long lead time, I happily agreed. Fast-forward several months later and I'm in my favorite fabric store where I discover this fabulous section I'd never looked in before: Ribbon. Spools upon spools of fantastic ribbon!

First, I spotted some lovely cherry ribbon, which I snagged a few yards of, then I saw this bee ribbon and it was all over for me. I practically had to run out of the store to prevent coming home with a car load of ribbon, it was all so wonderful. Of course I knew bees and cherries would make perfect adornments for that apron I had agreed to make and so I picked out the blue and yellow gingham you see above to complete the project. 

I will admit that when I started making this apron I fully intended to give it away, but being as this was my first designed-from-scratch piece, I made allotments for the seams, but not the hemming/edging, so my apron ended up being a little smaller than planned, so this one works as a lesson learned (and a little something pretty for my apron collection.)


Glamour Bee

The good news is that this apron only took me a weekend to complete (including finishing every seam so there are no raw edges - as inspired by Bitter Betty), so I should be able to make a new one fairly soon, though it'll likely be a variation on this one, just to keep things interesting. :)

Print Friendly and PDF Follow
follow us in feedly

My Poufy Shirt

IMG_3594.JPG

I don't know what it is about the week leading up to a big to-do that makes me want to sew so much, but it seems like whenever would be the least likely time to whip out the machine is exactly when I choose to do so. 


I'm going to admit. I'm not an everyday stitcher. I'm not even an every-week sewer, but book me a plane ticket out of the state and I'll set up the machine in the dining room.

I, of course, realize that some of this has to do with my need to show-off (seriously, I have a blog to document it all for goodness sake). Mothers and mothers-in-law are great audiences for showing-off my handmade stuff. 

For example, just before leaving for my bridal shower back last summer, I sat around hand-sewing the hem of a summer dress.  Just before I left for my wedding in October, I made this dress:

Lent Day 32

Just before I went to my mother-in-law's for Christmas I made this one:

Lent Day 31

This time around, I'm doing crazy-tons of theatre stuff and I make a shirt. I know you were expecting "dress," but I'm branching out. 

IMG_3589.JPG

So yes, I made a shirt. The last time I made a shirt, I was in high school and it was a very simple, very boxy men's bowling shirt and my dad got one of the folks at his work to stitch "Miss Leah" over the pocket. I still have it, and maybe after I add some much-needed darts to it, I'll post it here.

But after a 7 year or so break from shirts, I decided to dive back in again. You see, I have this *crazy* idea about slowly crafting an entire wardrobe - except t-shirts and underwear, because I'm not that crazy.

IMG_3580.JPG

Of course, about halfway through the shirt I realized that I didn't have a clue how to make buttonholes on this machine.

Let me say, I love the buttonholer on my machine. Love it! It made the whole process so easy I just want to run around putting buttonholes on everything. Forget cute as a button, how about cute as a buttonhole? And the more I type "buttonhole" in a row the less it sounds like I should be typing buttonhole. Also - did you know you can sew on a button with a machine? I'm so excited by this development in my life!

This was definitely A learning shirt, between the pin-tucks and lots of curved seams. But I'm super-proud of the hem and it was the best go I'm had with sleeves recently. So it's all to say I'm getting better - even if the collar on this shirt is a bit of a mess.

My other confession about this shirt? The contrast stitching was totally unintentional. I bought some dark blue thread for another project, which when I went to sew the shirt was the only blue thread I could find, so I assumed I got it for both projects. About halfway through the shirt I found the light blue thread. Ah well. As for that other project? I'm going to have to buy more thread, because this is ow much thread I had left at the end of this shirt:

IMG_3585.JPG


PS - for those who are curious. The pattern was McCall's M5322 version A without the trim.

Print Friendly and PDF Follow
follow us in feedly

Yellow + Blue = Green

With spring's arrival, I start yearning for new springier colors - namely bright yellows, blues and greens. This yearning is particularly pronounced on grey days like today, when I need pick-me-up. And so some colors that have been brightening my days recently.

Yellow Bracelet

My "Andi" bracelet from Luxcharm on etsy. I have a thing for bracelets right now. I never used to wear them (though until about a year ago when it broke I always wore a watch), but now I think they're great. This is the first in what may prove to become a bracelet collection.

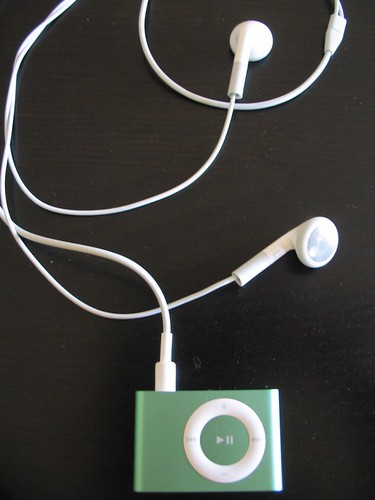
Green Ipod

My green ipod. Yep, we finally gave into the ipod revolution. They lowered the price, so Mr. Cleaver and I could no longer resist. Of course I have about 10 cds on my laptop, so the music isn't too varied right now, but it does make the 45 minutes on the train go a little faster.

Blue Siscors

My blue sewing scissors. When I bought my sewing machine last summer I also bought a sewing starter kit with scissors, needles, measuring tape, chalk paper, etc and all the appropriate accessories were blue. And so is the shirt I'm currently sewing, though it is more of sky than primary blue. The needle and thread were for slipstiching the inside collar. I hate slipstitching. Actually I have a terribly small amount of patience with any finishing really. Once all the major seams are in place I start wearing the thing. Seriously, I have two dresses that I've been wearing for months that need some finishing done. Ah well...


Daffodil Socks

I did, however, completely finish my Pomatomus socks, which hey - are yellow, blue and green! And considering the number of rows I had to rip back on these socks due to inattention, it's pretty amazing that I finished them as quickly as I did. Then again, knitting also makes that 45-minute commute home much faster.


Print Friendly and PDF Follow
follow us in feedly

Marryin' Mac 'n' Cheese

Mac 'n' Cheese

So good, if we weren't already married, my husband would marry me for it.

Like pretty much all of America, I grew up on the Kraft "Blue Box" Mac 'n' Cheese. My first taste of the homemade stuff was when my brother attempted to make some while I was in high school. I not sure what happened, but it was notthe best, shall we say. I retrospect, I think it needed salt. 

Years later, I came across this recipe in Real Simple Magazine and thought I'd give it ago, but I was a little put off by the called for 6 cups (!) of milk, and using the full quarter cup of oil on the bread make my crackers waaaay too greasy, so I did a few mild changes, as listed below.

And its really good. This is maybe one of Mr. Cleaver's favorite things I cook, and every so often (as with the Cherry Pie), he'll just "happen" to the buy the ingredients and if I just "happen" to want to make it, it would "happen" to be swell. I love it too, so it's not too hard to convince me.  

Mac 'n' Cheese Ingredients

Mac 'n' Cheese, adapted from Real Simple, Nov. 200. 

  • 1 pound elbow macaroni
  • 5 Tablespoons unsalted butter (plus some to grease dish)
  • ½ cup all-purpose flour
  • 3-4 cups whole or low-fat milk (I use 1% it turns out plenty rich and creamy)
  • 14 oz.-16oz.  cheese of choice (I like cheddar or you could do a mix.)
  • 2 teaspoons sea salt 

Herbed-Crumb Topping

  • 1 cup or about ½ a sleeve of your favorite butter crackers (Ritz, Keebler Club) smashed
  • 3 Tablespoons olive oil
  • oregano and thyme to taste
  • 1 teaspoon salt
  • ¼ teaspoon black pepper

Heat oven to 400°F and grease a 9x13 baking dish.

Cook the macaroni for slightly less time than the package says, so it's still a little firm. Drain and rinse.

While the mac is boiling, combine cracker crumbs, oil, herbs, salt and pepper. The oil should be just enough to coat and make the crumbs slightly stick together. 

In a saucepan, melt butter. While whisking constantly, add the flour and cook for about 3 minutes. The mixture will clump. Still stirring, add the milk and cook for another 7 minutes, the mixture will start to get thick.  Add the cheese and salt and stir until all the cheese is evenly melted.

Mix together the mac and the cheese, pour into the prepared dish and sprinkle with the crumbs.

Bake for about 25 minutes or until golden and delicious.

It'll sit like the brick of cheese and pasta it is in your stomach, but it'll be so worth it. 

Reheats really well in the oven too! 

Print Friendly and PDF Follow
follow us in feedly

Sunny Lemon Sorbet

Lemon Sorbet

It is 5:30pm in Chicago, sunny and 58°F. This is a cause for celebration.

And there's no better way to celebrate good weather than by pulling out the ice cream maker - one of the many wonderful and incredibly useful wedding gifts Mr. Cleaver and I received. We use our ice cream maker at least once a month, even throughout the winter, so to those who think an ice cream maker is that wedding gift that gets used twice and never again, I prove you wrong in this instance.

Now in interest of full disclosure, I made this sorbet a week ago when it was 35°, but after a long Chicago winter, when it finally hits 35 people start pulling out their shorts.

I had previously made a dark chocolate sorbet from that most wonderful of food-centric websites, Chocolate and Zucchini. It definitely a make again, but the sorbet, I think is really suited to the lightness and sweetness of fresh fruit. So, to bring a ray of sunshine into my kitchen, I opted for a Sunny Lemon Sorbet.

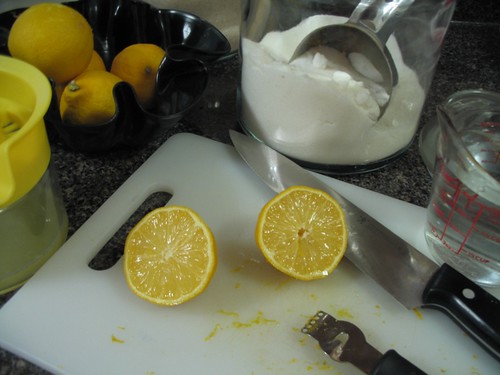
Sorbet Ingredients

Lemon Sorbet is maybe the easiest thing to make ever.

The ingredients:

  • 1 cup of fresh lemon juice
  • 1 cup water
  • 1 cup sugar
  • 1 tablespoon lemon zest
  • That's it! I love food with a small number of ingredients.

Mix all the ingredients together in a bowl and place in the fridge for a minimum of 4 hours, again - I always let it sit over night before I put it into the ice cream maker. This will allow the sugar to dissolve and the mixture to cool, so the machine doesn't have to work as hard.

Pour sorbet mixture into the ice cream machine and churn for about 30-45 minutes for a smooth, sweet and refreshing treat! Would pair well with shortbread cookies.

Print Friendly and PDF Follow
follow us in feedly

Chocolate Banana Bread Cake

Chocolate Banana Bread

The way these recipes are coming, people are going to start to think that the only place I ever ate decent food was in Portland, Maine and that I don't live in a rather major U.S. culinary city these days - because, yes, today's recipe was inspired by something I ate in Portland, Maine.

The restaurant in question today is Bibo's Madd Apple Cafe. This lovely and eclectic little spot is right next door to the theatre I used to work at. Actually it's the same building. In any case, this is one of my favorite eateries in the city and exactly what I like to think a cafe should be: classier and more adventurous than a diner or sandwich/burger joint, but not so intimidating that you couldn't eat lunch there. That is, a place a low-paid twenty-something could take both her friends and her parents. The jaunty atmosphere doesn't hurt either.

The first time I went there for lunch I sprung for dessert: the ever-so-delicious Chocolate Banana Bread Pudding Cake (with a warm chocolate center and whipped cream). Now as readers of this blog may know, I love me some banana bread. I also love me chocolate. So this dessert was right up my alley.

Though my Chocolate Banana Bread Recipe isn't the same as Bibo's (frankly, I'd have to try it again to get a better feeling of the dish), I'm pretty happy with how this variation turned out. This recipe is based on the aforementioned banana bread recipes and Clotilde's Chocolate and Zucchini Cake from her cookbook. I wanted a texture that was somewhere between cake and bread and this does that pretty well. The chocolate flavor is prominent, but not overly sweet and a sprinkle of powdered sugar makes a sweet compliment. I don't know if I'm completely finished with the recipe, but I've made a lot of banana bread in the past month or so, so I'm giving it a rest for now.

Chocolate Banana Bread

Chocolate Banana Bread Cake

(inspired by Bibo's Madd Apple Cafe and Clotilde's Chocolate and Zucchini Cake)

Makes 1 medium-sized loaf

  • 2-3 overripe bananas
  • ½ cup unsalted butter, softened
  • ¼ cup milk
  • 3 eggs
  • 2 tsp lemon juice or vinegar
  • 4 oz. unsweetened baking chocolate melted and mixed with 1/2 a cup of granulated sugar (or 4 oz. of chocolate chips).
  • 1¼ cup all-purpose flour
  • ¾ cup wheat flour
  • ¾ cup brown sugar
  • 1½ tsp baking soda
  • ½ cup unsweeted cocoa
  • ½ tsp salt
  • powdered sugar (optional)

Preheat oven to 350° F

Break up the bananas and butter into a large mixing bowl. With a sturdy whisk, mash together the butter and bananas until mixed well - the butter will still be a little chunky, but should be about pea-sized. Add eggs, milk and lemon juice, adding the juice last. Pour in the melted chocolate and mix well.

In a separate bowl, mix flours, brown sugar, cocoa, soda, and salt. Add to wet ingredients and mix well. If desired, you could add some unmelted chocolate chips at this point. Pour into a greased loaf pan.

Bake 55-60 minutes, or until tester comes out clean. Dust with powdered sugar and serve.

Print Friendly and PDF Follow
follow us in feedly

Barbeque Chicken Pizza

BBQ Chicken Pizza

A bit blurry, but you get the idea...

Back in the day, when I was interning at the Goodman Theatre, I brought in a slice of my BBQ chicken pizza for lunch. I was walking from the microwave to the room where we were having a lunch meeting and several other interns started hovering over my lunch, as hungry interns are  often wont to do.

Now, I like to think the admiration of my pizza was due to the pizza and not just the noon-time hunger striking, but the world may never know. Unless, that is, you try out the recipe!

This is another one of those I-kinda-stole-this-from-a-Portland-restaurant recipes. For backing when I was interning in Maine (Yeah, I've done a lot of internships, five in fact. Six, if you count the two seperate summers at NVSF), my roommates and I fell in love with a pizza called the "Harbor Master" at Portland Pie. I'd never been much for chicken on pizza before, but man - this one was good.  And now that I'm approximately 1,086 miles away from a Portland Pie, I had to start making them on my own. My biggest change is the removal of a standard pizza sauce for straight-up BBQ sauce goodness.

Depending on what I have around the house this shifts around a little: sometimes they'll be bacon, sometimes basil, sometimes just chicken and cheese. Pizza's good that way.

BBQ Chicken Pizza Ingredients

BBQ Chicken Pizza (adapted from Portland Pie Co.)

  • 1 large boneless, skinless chicken boob cut into small pieces.
  • 1 package of pizza dough (mine's wheat and from Trader Joes, I've used the Pillsbury in a can quite often, and of course, you could always make your own if you're feeling fancy)
  • corn meal for the pan/stone
  • barbeque sauce - my ultimate favorite is the Chicago-based Sweet Baby Ray's, but as Mr. Cleaver and I learned when we tried to bring some to his mom as a gift, it's available all over the USA now.
  • ½ white onion, diced (optional)
  • 3 strips bacon, chopped (optional)
  • basil (fresh or dried or optional)
  • cheese (so not optional) I usually use a whole bag of the italian mix, but again, you could get all fancy and grate you own.

Preheat the oven to 400-425°F.  Sprinkle your pizza pan/stone/cookie sheet with some cornmeal to prevent sticking and place rolled out dough on top.

If using, brown the diced onions in a little butter, just enough to the the raw taste off. Remove onions and cook bacon in same pan.

At this point, I usually put the crust (sans anything) into the oven to pre-bake for about 5 minutes.

After the bacon is cooked, remove and drain any fat. Cook the chicken bits until throughly cooked through. Shred any large chicken pieces with a fork. Coat the shreed chicken with BBQ sauce.

Take your pre-baked crust and cover with BBQ sauce like you would any thin pizza sauce. (see below).

BBQ Chicken Pizza

Once you're all sauced up, add the cheese. Then top with the chicken, bacon, onion, and basil, and maybe a little more cheese (I never said this was healthy). Put it all back in the oven and cook for another 5-7 minutes or until the cheese is all good and melty.

Let cool a tad (I'm notoriously bad for burning my mouth on food), slice and serve.

And see if a couple of interns don't start sniffing their way over :)

BBQ Chicken Pizza
Print Friendly and PDF Follow
follow us in feedly

Abercrombie & Stitch: a Sweater Adventure

Abercrombie Soft Box

The summer of 2001, my mother and I went to the mall in search of wool sweaters. I was about to go to college in Oregon and word on the street was it was cold there, so my sandal-shod self, flip-flopped my way through the American Eagles and Pac-Suns of the Fairfield mall in search of pac-northwest worthy garb.

For reasons still unknown to me, I made my way into Abercrombie & Fitch. Now, were this 1901, it would make sense, when it was an outdoor outfitters, more akin to the L.L. Bean than the Gap. However, it being 2001, Abercrombie was home to pre-frayed baseball hats and photos of men with hardly any clothing on, which always seemed like a terrible way to sell clothing to me.

Regardless of any disregard I may have for the store, in I went and purchased my favorite sweater for the next 6½ years: a grey wool, zip-up hoodie.

WinCo Pumpkin Patch Adventure

Me and my sweater on a "pumpkin patch" adventure in 2004.

I loved that sweater, but the years of wear were starting to show. First the wrists started to unravel and loosen. Then the holes started to appear at the seams. When Mr. Cleaver pointed out a nearly two-inch hole in the right arm pit, I had to admit it was time to retire the thing. But having immersed myself in the world of craft blogs, I knew this was not the end. Yes, my old sweater could have a second life -- felted.

Now, my blogosphere doppleganger beat to me to the punch with this post on sweater felting/crafting, but I figured after 6½ years of warmth, my sweater deserves a blog entry as a send off.

IMG_2969.JPG

RIP old sweater...

I was first inspired by these coasters I saw on Design*Sponge. Then I saw this fabric box linked on Sew Mama Sew and thought it would would be awesome in felt (like I said, I read a lot of blogs, my work day is slow). Yes, I decided coasters would be a dignified end for my favorite sweater.

Felted Sweater

Original sweater on the left, felted on the right. Wasn't this thing supposed to shrink?

But before I could make coasters I had to felt the sweater. This proved more difficult than one would think. I mean, everyone is always saying "Don't put your sweater in the washer or dryer or it will only be fit for your Chihuahua!" The first two times I washed and dried this (both on high temps, mind you) it just got clean and fluffy. On the third try, it got a little felted. At this point I gave in and did it by hand, with the above results.

Sweater Coasters

Coasters in action.

With the felting done, I cut out my pieces, used my sewing machine to add some decorative stitching and I was in business. I have to say, my old sweater works excellently as both coasters and a change bowl/box. Best part? I still have over half the sweater left and I just might have an idea of what to do with it....

Abercrombie Soft Box

Print Friendly and PDF Follow
follow us in feedly